ArcGIS Server站点重建
ArcGIS Server常见问题及解决方案
配置sde使可以使用sde sql(ST_Geometry)操作空间数据
- 注意:ArcGIS Server许可过期,需重新进行许可授权。在此之后,ArcGIS DataStore也必须更新许可才行,否则会出现ArcGIS Pro无法发布地图服务的问题
- /home/arcgis/arcgis/datastore/tools/updatelicense.sh
ArcGIS Server 字体文件配置
复制字体文件到如下目录
/app/arcgis/server/fonts

cd /app/arcgis/server/fonts

执行如下命令确认字体文件用户权限
ll -al

执行如下命令变更文件权限

chown arcgis:crcgas JJGAS*.ttf
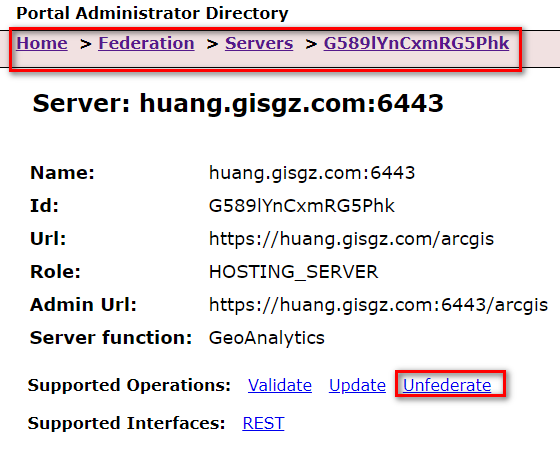
ArcGIS Portal解除托管
https://giswebadaptor01.crcloud.com/portal/portaladmin/federation/servers

https://giswebadaptor01.crcloud.com/portal/sharing/rest
在右上角有个login登录界面,使用portal管理员账号登录
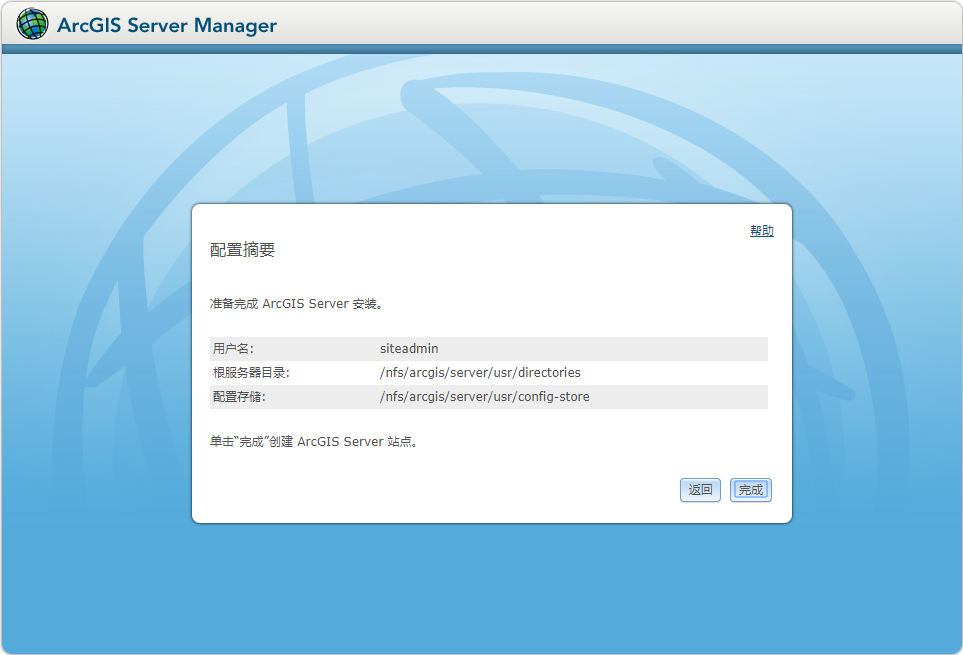
使用 createsite 命令行实用程序,请使用 -h 或 -help 运行 createsite.sh 脚本,如下所示:
ArcGIS Server Installation Directory/tools/createsite/createsite.sh -help
./createsite.sh -u siteadmin -p WebGisServer#321 -d /nfs/arcgis/server/usr/directories -c /nfs/arcgis/server/usr/config-store
ArcGIS Server卸载
# su arcgis
$ cd /app/arcgis/server
$ ./stopserver.sh
$ su root
# systemctl disable arcgisserver.service
# rm -f /etc/systemd/system/arcgisserver.service
# su arcgis
$ ./uninstall_ArcGISServer -s
$ cd ..
$ rm -rf server
ArcGIS Server安装准备
1、关闭防火墙
[root@localhost /]# systemctl stop firewalld
[root@localhost /]# systemctl disable firewalld

**关闭selinux **
进入到/etc/selinux/config文件
vi /etc/selinux/config
将SELINUX=enforcing改为SELINUX=disabled
2、创建用户和组
以用户 ags(用户 ID 58103)的身份将 ArcGIS Server 安装到计算机 A 上的 /data/ags 下。
以相同用户名和 ID(ags,用户 ID 58103)将 ArcGIS Server 安装到计算机 B 上的 /data/ags 下。
创建名为 config-store 的目录。将所有者指定为 ags,用户为 ID 58103。至少授予对目录的 700 权限。
共享 config-store 文件夹,以使两台计算机都能使用相同路径(如 /net/myserver/config-store)访问该目录。
创建名为 arcgisserver 的目录。将所有者指定为 ags,用户为 ID 58103。至少授予对目录的 700 权限。
共享 arcgisserver 文件夹,以使两台计算机都能使用相同路径(如 /net/myserver/arcgisserver)访问该目录。
即使这些目录都位于您在创建站点时所使用的同一台计算机上,也必须手动创建和共享这些目录,然后通过网络路径引用它们。
创建用户和组
    groupadd crcgas -g 1193
    useradd -g crcgas -m arcgis -u 1193 -p arcgis
3、更改机器名
4、编辑limits.conf
vi /etc/security/limits.conf
arcgis soft nofile 65535
arcgis hard nofile 65535
arcgis soft nproc 25059
arcgis hard nproc 25059
ArcGIS Server安装
许可文件位置:/app/arcgis/server.ecp
ArcGIS Server安装路径:/app/arcgis/server
# su arcgis
$ cd /app/arcgis/ArcGISServer
$ ./Setup -m console

Installation Complete
---------------------

Congratulations. ArcGIS Server 10.7.1 has been successfully installed to:

/app/arcgis/server

You will be able to access ArcGIS Server Manager by navigating to
https://gisserver01.crcloud.com:6443/arcgis/manager.

$ cd /app/arcgis/server/framework/etc/scripts
$ su root
# cp arcgisserver.service /etc/systemd/system
# chmod 600 -R /etc/systemd/system/arcgisserver.service
# systemctl enable arcgisserver.service
# systemctl stop arcgisserver.service
# systemctl start arcgisserver.service
# systemctl status arcgisserver.service
ArcGIS Server配置Oracle数据库连接
如果 Oracle 和 ArcGIS Server 在不同的服务器上运行,则应在 ArcGIS Server 站点上的所有计算机上安装 64 位 Oracle 客户端。
如果 Linux 服务器上安装了 ArcGIS Server,则编辑与 ArcGIS Server 一同安装的 init_user_param.sh 脚本以包含 Oracle 客户端和实例的相关信息,并重新启动 ArcGIS Server。
如果希望发布到 ArcGIS Server 的服务使用 Oracle 中数据库或地理数据库的数据,则请将数据库注册到您的 ArcGIS Server 站点。
NFS文件夹挂载
yum -y install nfs-utils rpcbind
systemctl enable nfs.service
systemctl enable rpcbind

建立文件夹
mkdir -p /nfs
在/etc/exports中加入一个nfs的mount点
# cat /etc/exports
/nfs 10.207.32.0/24(rw,sync,no_root_squash)
重新启动nfs
systemctl restart nfs.service
检验是否开启成功:
showmount -e

同局域网服务器挂载NFS网络磁盘
yum -y install nfs-utils rpcbind
showmount -e 10.207.32.19
mkdir /nfs -p
mount -t nfs 10.207.32.19:/nfs /nfs

mount -t nfs -o actimeo=0 10.207.32.19:/nfs /nfs

验证NFS挂载
df

设置系统启动自动挂载:

我们不要把挂载项写到/etc/fstab文件中,因为开机时先挂载本机磁盘再启动网络,而NFS是需要网络启动后才能挂载的,所以我们把挂载命令写入到/etc/rc.d/rc.local文件中即可。

chmod 755 /etc/rc.d/rc.local
vi /etc/rc.local
#在文件最后添加一行:
mount -t nfs 10.207.32.19:/nfs /nfs


/etc/exports文件内容格式:
<共享目录> [客户端1 选项(访问权限,用户映射,其他)]
用户映射选项
all_squash:将远程访问的所有普通用户及所属组都映射为匿名用户或用户组(nfsnobody);
no_all_squash:与all_squash取反(默认设置);
root_squash:将root用户及所属组都映射为匿名用户或用户组(默认设置);
no_root_squash:与rootsquash取反;
anonuid=xxx:将远程访问的所有用户都映射为匿名用户,并指定该用户为本地用户(UID=xxx);
anongid=xxx:将远程访问的所有用户组都映射为匿名用户组账户,并指定该匿名用户组账户为本地用户组账户(GID=xxx);
其它选项
secure:限制客户端只能从小于1024的tcp/ip端口连接nfs服务器(默认设置);
insecure:允许客户端从大于1024的tcp/ip端口连接服务器;
sync:将数据同步写入内存缓冲区与磁盘中,效率低,但可以保证数据的一致性;
async:将数据先保存在内存缓冲区中,必要时才写入磁盘;
wdelay:检查是否有相关的写操作,如果有则将这些写操作一起执行,这样可以提高效率(默认设置);
no_wdelay:若有写操作则立即执行,应与sync配合使用;
subtree:若输出目录是一个子目录,则nfs服务器将检查其父目录的权限(默认设置);
no_subtree:即使输出目录是一个子目录,nfs服务器也不检查其父目录的权限,这样可以提高效率;
ArcGIS Server创建新站点
安装和配置ArcGIS DataStore
解除Datastore绑定
打开Server admin站点
https://giswebadaptor01.crcloud.com/arcgis/admin/
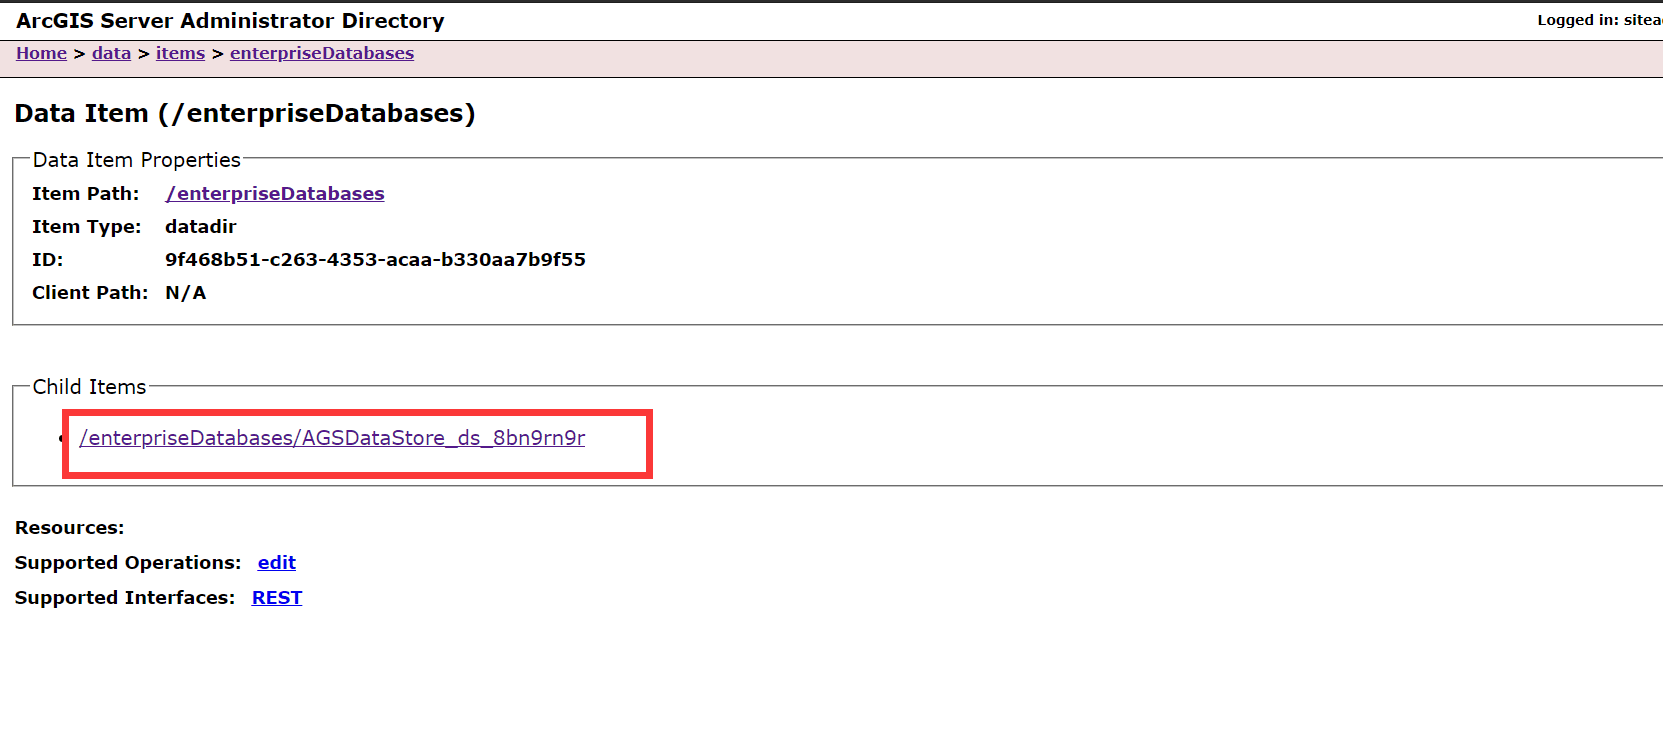
登录后依次打开data>items>nosqlDatabases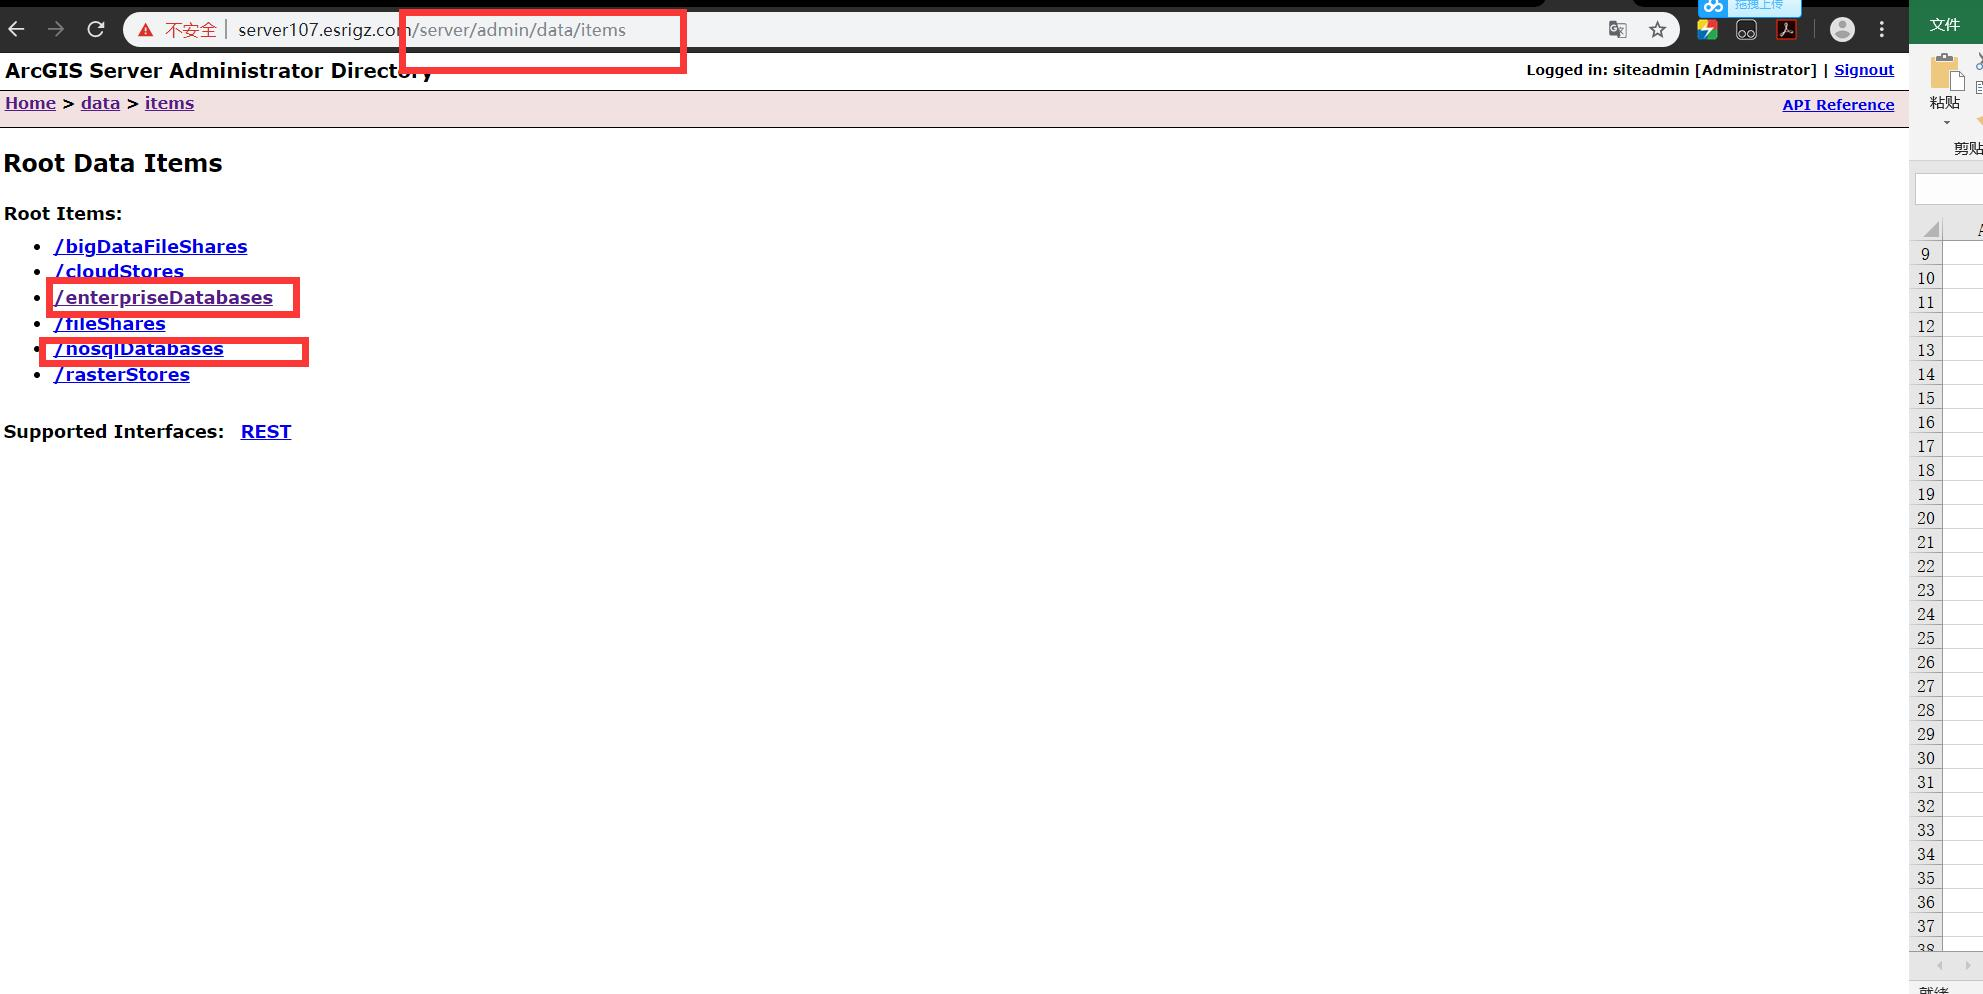

卸载ArcGIS DataStore
systemctl disable arcgisdatastore.service
rm -f /etc/systemd/system/arcgisdatastore.service

su arcgis
/home/arcgis/arcgis/datastore/uninstall_ArcGISDataStore -s
安装ArcGIS DataStore
/app/arcgis/ArcGISDataStore_Linux/Setup -m silent -l Yes

su root
cp /home/arcgis/arcgis/datastore/framework/etc/scripts/arcgisdatastore.service /etc/systemd/system
chmod 600 -R /etc/systemd/system/arcgisdatastore.service

systemctl enable arcgisdatastore.service
systemctl stop arcgisdatastore.service
systemctl start arcgisdatastore.service
systemctl status arcgisdatastore.service- 注意:目前华润云服务器,DataStore服务启动需要6分钟左右
创建数据存储
vim /home/arcgis/arcgis/datastore/framework/etc/hostidentifier.properties
hostidentifier=10.207.32.10

方式一、
使用数据存储配置向导创建数据存储
https://giswebadaptor01.crcloud.com:2443/arcgis/datastore
切片缓存配置到NFS网络共享路径下
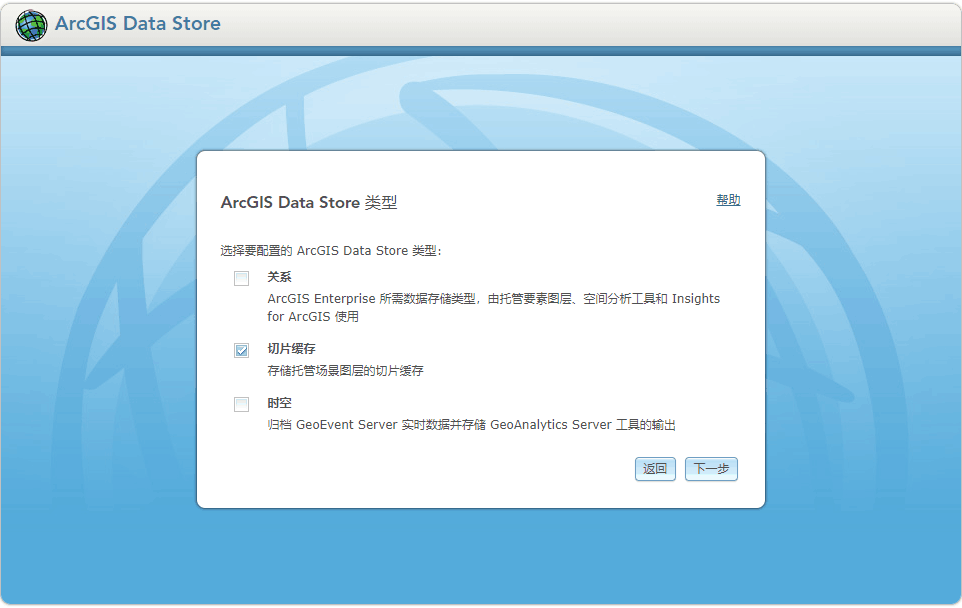
关系型数据存储配置到Oracle中
方式二、
使用 configuredatastore 实用程序创建数据存储
su arcgis
/home/arcgis/arcgis/datastore/tools/configuredatastore.sh https://gisserver01.crcloud.com:6443 siteadmin WebGisServer#321 <directory> [configure-options]
安装和配置ArcGIS Portal
卸载ArcGIS Portal
systemctl disable arcgisportal.service
rm -f /etc/systemd/system/arcgisportal.service

su arcgis
/app/arcgis/portal/uninstall_ArcGISPortal -s
安装ArcGIS Portal
安装路径:/app/arcgis
/nfs/software/PortalForArcGIS/Setup -m console
配置ArcGIS Portal
cd /app/arcgis/portal/framework/etc
cp arcgisportal.service /etc/systemd/system
chmod 600 -R /etc/systemd/system/arcgisportal.service
systemctl enable arcgisportal.service
systemctl stop arcgisportal.service
systemctl start arcgisportal.service
systemctl status arcgisportal.service
Web Adaptor
卸载ArcGIS Web Adaptor
注销 Web Adaptor
    https://gisserver01.crcloud.com:6443/arcgis/manager/
    单击站点 > Web Adaptor
    单击注销 Web Adaptor

卸载 Web Adaptor
/root/arcgis/webadaptor10.7.1/java/uninstall_WebAdaptor -s
安装Web Adaptor
/nfs/software/WebAdaptor/Setup -m silent -l Yes

cp /root/arcgis/webadaptor10.7.1/java/arcgis.war /app/tomcat8/webapps/arcgis.war
cp /root/arcgis/webadaptor10.7.1/java/arcgis.war /app/tomcat8/webapps/portal.war

/root/arcgis/webadaptor10.7.1/java/tools/configurewebadaptor.sh -m server -w https://giswebadaptor01.crcloud.com/arcgis/webadaptor -g https://gisserver01.crcloud.com:6443 -u siteadmin -p WebGisServer#321 -a true

/root/arcgis/webadaptor10.7.1/java/tools/configurewebadaptor.sh -m portal -w https://giswebadaptor01.crcloud.com/portal/webadaptor -g https://giswebadaptor01.crcloud.com:7443 -u arcgis -p WebGisServer321
tomact开机自动启动
tomcat安装路径:/app/arcgis/tomcat8

vi  /app/arcgis/tomcat8/bin/catalina.sh

增加以下内容(脚本定义变量的前面):

export CATALINA_BASE=/app/arcgis/tomcat8
export CATALINA_HOME=/app/arcgis/tomcat8
export CATALINA_TMPDIR=/app/arcgis/tomcat8/temp
export JAVA_HOME=/app/arcgis/jdk8

vi /etc/systemd/system/tomcat.service
[Unit]
Description=Tomcat
After=syslog.target network.target remote-fs.target nss-lookup.target

[Service]
Type=oneshot
ExecStart=/app/arcgis/tomcat8/bin/startup.sh
ExecStop=/app/arcgis/tomcat8/bin/shutdown.sh
ExecReload=/bin/kill -s HUP $MAINPID
RemainAfterExit=yes

[Install]
WantedBy=multi-user.target

systemctl enable tomcat.service
服务发布
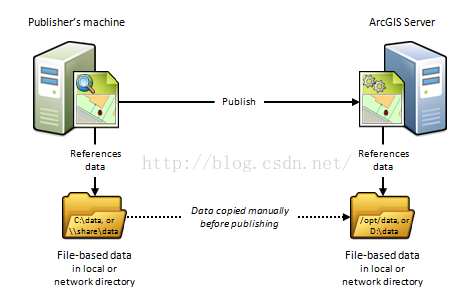
发布数据到linux版的server集群中,要求采用文件夹注册方式,数据量较大避免数据拷贝过程。
由于防火墙的存在、计算平台之间的差异或者保留一份单独的数据副本以便在 Web 中使用,发布者与服务器可能各自使用自己的数据文件夹。要使用此方案注册您的数据,需要输入到发布者文件夹以及服务器文件夹的路径。
安装ArcGIS API for JavaScript library
安装Apache
yum -y install httpd
vim /etc/httpd/conf/httpd.conf
    Listen 6081
systemctl start httpd.service
lsof -i:6081
systemctl enable httpd
cd /nfs/software/arcgis_js_v412_api
cp -r arcgis_js_api /var/www/html

vim /var/www/html/arcgis_js_api/library/4.12/dojo/dojo.js

查找[HOSTNAME_AND_PATH_TO_JSAPI],替换为:
https://giswebadaptor01.crcloud.com:6081/arcgis_js_api/library/4.12/

以下为改好的文件直接复制
cp -f /nfs/software/ArcGIS_JS_API_4.12_ConfigFile/dojo.js /var/www/html/arcgis_js_api/library/4.12/dojo

vim /var/www/html/arcgis_js_api/library/4.12/init.js
查找[HOSTNAME_AND_PATH_TO_JSAPI],替换为:
https://giswebadaptor01.crcloud.com:6081/arcgis_js_api/library/4.12/

以下为改好的文件直接复制
cp -f /nfs/software/ArcGIS_JS_API_4.12_ConfigFile/init.js /var/www/html/arcgis_js_api/library/4.12
ArcGIS Server配置Oracle数据库连接
vi /home/arcgis/arcgis/server/usr/init_user_param.sh

export ORACLE_BASE=/app
export ORACLE_HOME=$ORACLE_BASE/oracle/product/19.0.0/client_1
export ORACLE_SID=gisdevpdb
export TNS_ADMIN=$ORACLE_HOME/network/admin
export PATH=$ORACLE_HOME/bin:$PATH
export LD_LIBRARY_PATH=$ORACLE_HOME/lib:$LD_LIBRARY_PATH
ArcSDE许可更新
【问题分析】:
从原理上来说,其实就是更新server_config表中char_prop_value列AUTH_KEY的值
【解决办法】:
可以使用sql语句直接更新
 SQL> update server_config set char_prop_value=
 'arcsdeserver,100,ecp6411231313,none,1234567843223343252342424243'(该字符串是ecp文件中的第一行)
 where prop_name='AUTH_KEY';

commit;